1. The Window Opening:
The window opening must be 3/8" larger than the order size of the window. For example, if the order size of the window is 16" x 24" add 3/8" to each dimension for and opening size of 16 3/8" x 24 3/8". Do not add 3/8" to all four sides. Be sure the opening is cut exactly to these dimensions. The four sides must be straight and square. The radius of each corner is 3 3/16".
2. Caulking:
Caulk the wide outer flange of the window (the part of the window frame that seals against the outside wall) with a suitable non-hardening caulk or putty tape. If using putty tape, cut the ends at a 45 - 60 degree angle where they join. Butt the ends securely with no overlap. Place the caulking joint along the bottom of the window flange. If leakage occurs at this joint, the water will be directed downward along the outside wall. Be sure the caulking material makes a good contact with the flange. If necessary, gently press it into place, but don't flatten it.
3. Installation:
- To insure a proper fit and seal on formed sheet metal surfaces remove any splintering, ragged edges or roughness.
- Fit the clamp ring into the opening from the interior side of the RV. DO NOT FORCE THE CLAMP RING INTO POSITION. If the rings doesn't slip into position easily, check the perimeter of the opening and remove an high spots.
- Place the window into the opening with the weep holes toward the bottom.
- Visually check the clamp ring and window alignment. The clamp ring holes should align with the window frame screw groove. If necessary, carefully align the clamp ring and the screw groove with an awl.
- Install four #8 x 1/2" or 5/8" type "A" Phillips head "starter" screws. DO NOT TIGHTEN THESE SCREWS. They hold the window and clamp ring in position while the other screws are being started. In some cases, as with heavy corrugated siding, 5/8" or 3/4" long screws will be required. The screws will pull the window and clamp ring together so that 1/2" screws can be used for assembly.
- CAUTION - Do not use screws longer than 3/4" or larger than #8. Longer or larger screws may distort or damage the window.
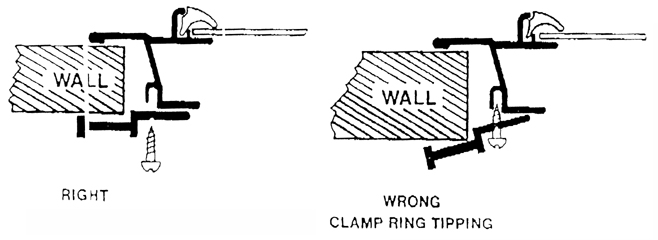
- If the clamp ring and window frame will not align properly (see illustration). Check the wall thickness first. The wall thickness must meet clamp ring specifications. If the wall thickness meets clamp ring specifications, make sure the window hole has been cut properly. If the problem still remains, check the putty tape - it may be to thick.
- The clamp ring can be correctly positioned by placing a wooden block against the ring and carefully tapping the block with a hammer. If you have not taken the necessary precautions (see #7) to be sure the correct clamp ring is used. YOU CAN DAMAGE THE WINDOW FRAME AND OVERSTRESS THE GLASS.
4. General Care:
- Any ventilating window may permit water inside. This water must be trapped and provisions made for draining it to the outside. On this window, water is trapped by the frame. During a heavy downpour, especially while driving, water may be seen in the lower portion of the frame. Weep slots provide drainage to the outside. These weep slots must be kept open.
- Vinyl tracks, located in the metal frame must be kept clean. Regularly vacuum and wipe these tracks with a soft cloth or sponge, and spray with silicone lubricant for easier sliding.
- Every three months, inspect the caulking along the outer flange, especially the top, where the window seals against the exterior wall of the vehicle.
- If necessary, re-caulk the gaps with a non-hardening caulk or sealing compound.