1. RV Window Opening:
Flange Mount: The window opening must be 1/4" larger that the inside dimensions of the window. For example, it the actual window size is 20"H x 40"W add 1/4" to each dimensions. The final measurements are 20 1/4"H x 40 1/4"W. The corner radius of the window opening is 3 11/32"
Clamp Ring Mount: The window hole must be 1/4" larger than the order size of the window. See above explanation for details.
2. RV Window Caulking:
Caulk the wide outer flange of the window (the area that seals against the outside wall) with a suitable non-hardening caulk. If using putty tape, cut the ends to a 45 to 60 degree angle where they join. Butt these ends securely with no overlap at the bottom of the window.
3. RV Window Installation:
The RV window hole must be exact. Use the corner blocks part # H009-337 with studded walls. Fasten the corner blocks in place with staples.
4. Installing RV Window Clamp Ring:
A. Fit the clamp ring into the RV window hole from the interior side of the vehicle. The RV window opening must be large enough to avoid forcing the clamp ring into position. If the clamp ring doesn't slip into position easily check the perimeter of the opening and remove any high spots or irregularities.
B. Place the RV window into the opening with the weep holes at the bottom. Use spacer blocks provided to help center window properly.
C. Visually check the clamp ring and RV window alignment. The clamp ring holes should align with the RV window frame screw groove. If necessary, align the clamp ring and the screw groove with an awl.
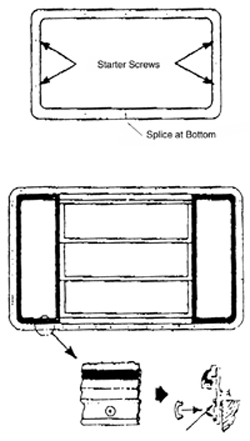
D. Install four number 8 x 12 or 5/8" type "A" Phillips head screws "starter screws". Do not tighten these screws, as they will hold the RV window and clamp ring in position while the other screws are being. In some cases, as with heavy corrugated siding, it may be necessary to use 5/8" or 3/4" long starter screws. These screws will pull the RV window and clamp ring together so that 1/2" screws can be used.
Caution:
Do not use screws longer than 3/4" or #8. Longer or larger screws may distort or damage the window. Longer or larger screws may distort or damage the window.
When the wall thickness exceeds the depth of the window, use a long shank screwdriver to avoid damaging the clamp ring.
If the clamp ring tips: Check the wall thickness first. The wall thickness may exceed the clamp ring specifications. If the wall thickness does not exceed the clamp ring specifications, make sure the exterior skit is flat. If the problem still remains, check the putty tape, it may be too thick.
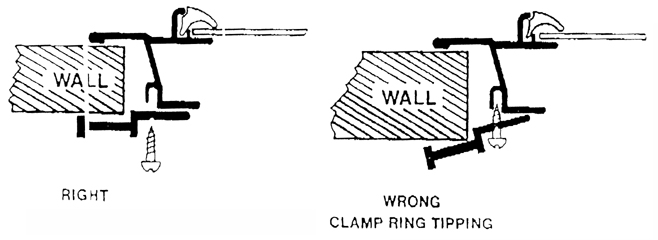
The clamp ring can be correctly positioned by placing a wooden block against the ring and carefully tapping the block with a small hammer. If you have not take the necessary precautions (see the above paragraph) to be sure the correct clamp ring is used, you can damage the window frame and overstress the glass.
5. Installing Flange Mount Window (Exterior Screw Mount):
A. Install the interior garnish (trim ring) first.
B. Place the window in the hole. Be sure the weep holes are at the bottom. Spacer blocks are provided to help center the window in the opening. These may be removed if interior garnish is used.
C. Use #6 pan head type "A" point screws for window installation. Lower profile head screws, such as oval or flat head screws will facilitate screw cover installation. #8 head screws may be used, but may split the wood or interfere with them vinyl screw cover. Drill 3/32" pilot holes to reduce wood splitting when using larger screws.
D. Install four "starter" screws at the outer edges of the RV window.
E. Install the remaining screws. Do not over-tighten these screws. The frame may be distorted, especially in the splice area. If the screws are inserted and tightened on an angle, the seal may be broken, and the glass stressed causing leaks.
F. Install the screw cover. Start near the center of the lower flange and work around the window. Be careful no to stretch the screw cover.
G. Cut the cover slightly long and force the excess into the groove. This will reduce the "pulling" caused by shrinkage.
Apply a little adhesive to the legs of the extrusion at the joint of the cover. The adhesive will keep the cover in position.
6. Leaks:
Any ventilating window ma permit water inside. This water must be trapped and provisions made for draining it to the outside.
On the 7900 series window, water is trapped by the frame, during a heavy downpour, especially while driving, water may be seen in the lower portion of the frame. The sloping sill and weep slots allow the water to drain to the outside. These weep slots must be kept open.
7. If water collects in the bottom channel and overflows:
A. Check the weep slots for obstructions such as dirt, sawdust, leaves, etc.
B. A negative pressure (partial vacuum) created inside a moving vehicle can draw water through the window preventing the weep slots from functioning properly. Opening a roof vent or "cracking" a window toward the rear of the vehicle may help relieve the vacuum.
C. Check source of water
• If the window is a non-opening type and water is coming in around the edge of the glass, remove the glazing bead and check the condition of the sealing tape. If the tape is not sealing, replace the tape or caulk with a non-hardening sealer.
• If water is coming in between the window frame and the clamp ring. The leaks are originating between the window and exterior cladding or skin of the unit, rather than through the window. For instance, water can penetrate a seam or a clearance light, travel inside the wall to the window, then leak into the vehicle.